In this tutorial, we will create the Apache Solr Project, which will receive search text from the Client HTML page and execute it in the Solr Search Engine and return the search result to the Client HTML page.
So readers ... are you ready to create an Apache Solr project. (Search-Data-Using-Solr)
1. Idea Of Project
| a. Start the Solr search engine in the Solr System and upload raw CSV data files to the Solr System. |  |
| b. Start the client application in the Client System. Once the client web page opens, select the option and enter the search query that you want to search in the uploaded raw CSV data files. |  |
| c. The Solr System receives the submitted query and executes it on the Solr search engine. After successful execution, get the result and pass it to the Client System. |  |
| d. After the result data is received from the Solr System, the Client System displays the result on the client web page. |  |
2. Building Of Project
To run this project you can install VM (Virtual Machine) on your local system and configured Solr on that. After this configuration, your local system will work as a Client System and Solr VM will work as a Solr System. Alternatively, you can take two systems that are communicating with each other and on one of the systems, Solr is configured.
Let us see this project in detail and run it using the below steps.
| a. The Client System | ||
|---|---|---|
| It is an example of the Spring Boot JAVA Framework. When we will build this project then it will create an "app.jar" executable file. |  |
|
| It has java code and static HTML pages. | ||
| Java code has 1 file, SolrController.java | ||
| SolrController.java is the main project file, which is responsible for building code and running it on an embedded server. This file also has client services code (which helps with client activities) like executeQuery(). | ||
| The Static folder has HTML page code (index.html). This is the main client view page which has the input query form and shows the process result data. | ||
| pom.xml is a project build tool file. This file has java dependencies and builds configuration details. | ||
| For creating the “app.jar” file we use the command "mvn clean package". | ||
| Click Here To Download the "SolrApplication" project zip file. | ||
| b. Apache Solr System | ||
|---|---|---|
| The Solr System has the Apache Solr setup installed and ready to use. To easily execute the project we will run Solr services on one machine and we will use another machine to run the client application. | ||
| Below setup to run the solr services in the system ... | ||
| Go to the Solr downloaded folder and execute the command to run the Solr service. SolrSystem % cd /home/solr-8.11.1/ SolrSystem solr-8.11.1 % ./bin/solr start 
|
||
| In the next step create Solr core. SolrSystem solr-8.11.1 % ./bin/solr create -c books 
|
||
|
Click Here To Download the "book.csv" raw file.
The next step is to insert the raw CSV file into the Solr system. SolrSystem solr-8.11.1 % ./bin/post -c books /home/books.csv 
|
||
3. Run The Project
| a. Client System | b. Solr System | |
|---|---|---|
| 1. | Download the app.jar in the Client System. Click Here To Download the "app.jar" executable jar file. |
Start the Solr service in the system and create a core in it. After creating core in Solr, add raw data file in that created core. |

|

|
|
| 2. | Run app.jar in the client system. At execution time pass Solr system host and port as argument values. Here Solr is running in the same machine so passing localhost otherwise Solr system IP address has to be passed in place of localhost. And here Solr service is running on port 8983.java -jar app.jar <Solr-System-Host-IP-Address> <Solr-Service-Port-Number>java -jar app.jar localhost 8983
|
|
 |
||
| 3. | After successfully running the client application, open the Web browser and check the Client web page using URL: http://localhost:8080 | |
 |
||
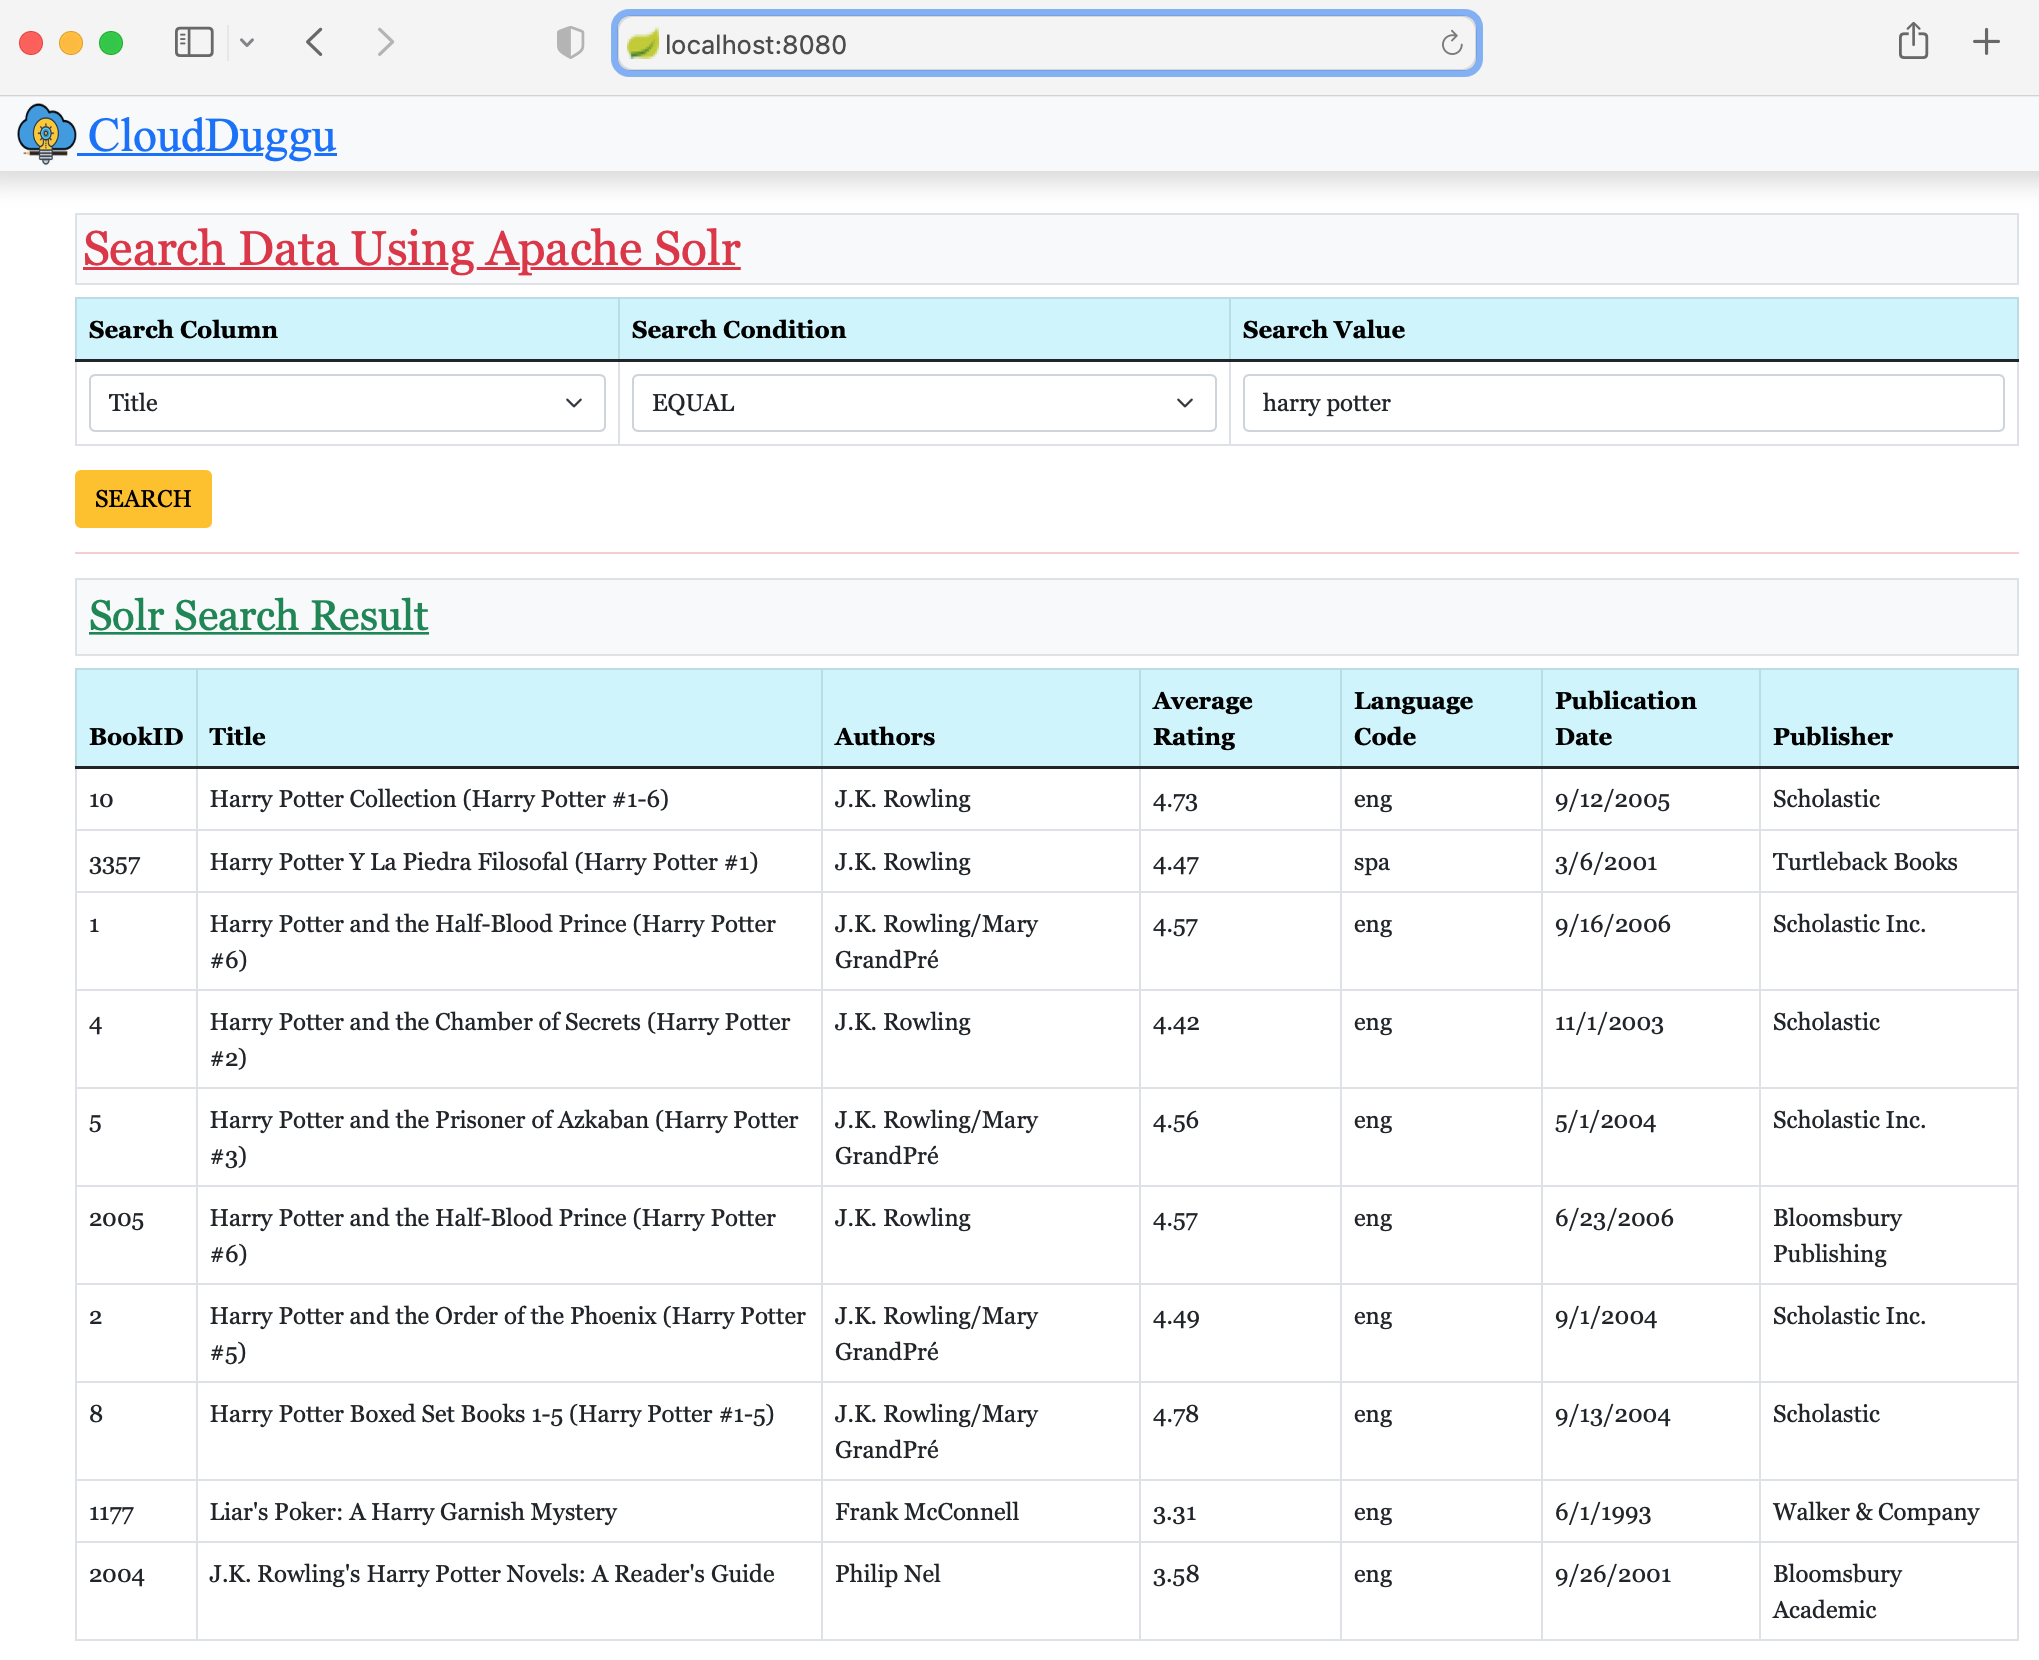
| 4. | Once the client page is opened, start searching in the posted raw book CSV file with the help of the Solr search service. The client page shows attractive looks for easy execution of the query. Now select an option from search options and enter the search value and press the search button for the result. | |
 |
||
| 5. | After successful query execution, Solr System returns the result to the Client System. And after getting success the client application shows the result on the same page. | |
 |
4. Project Files Description In Detail
SolrController.java
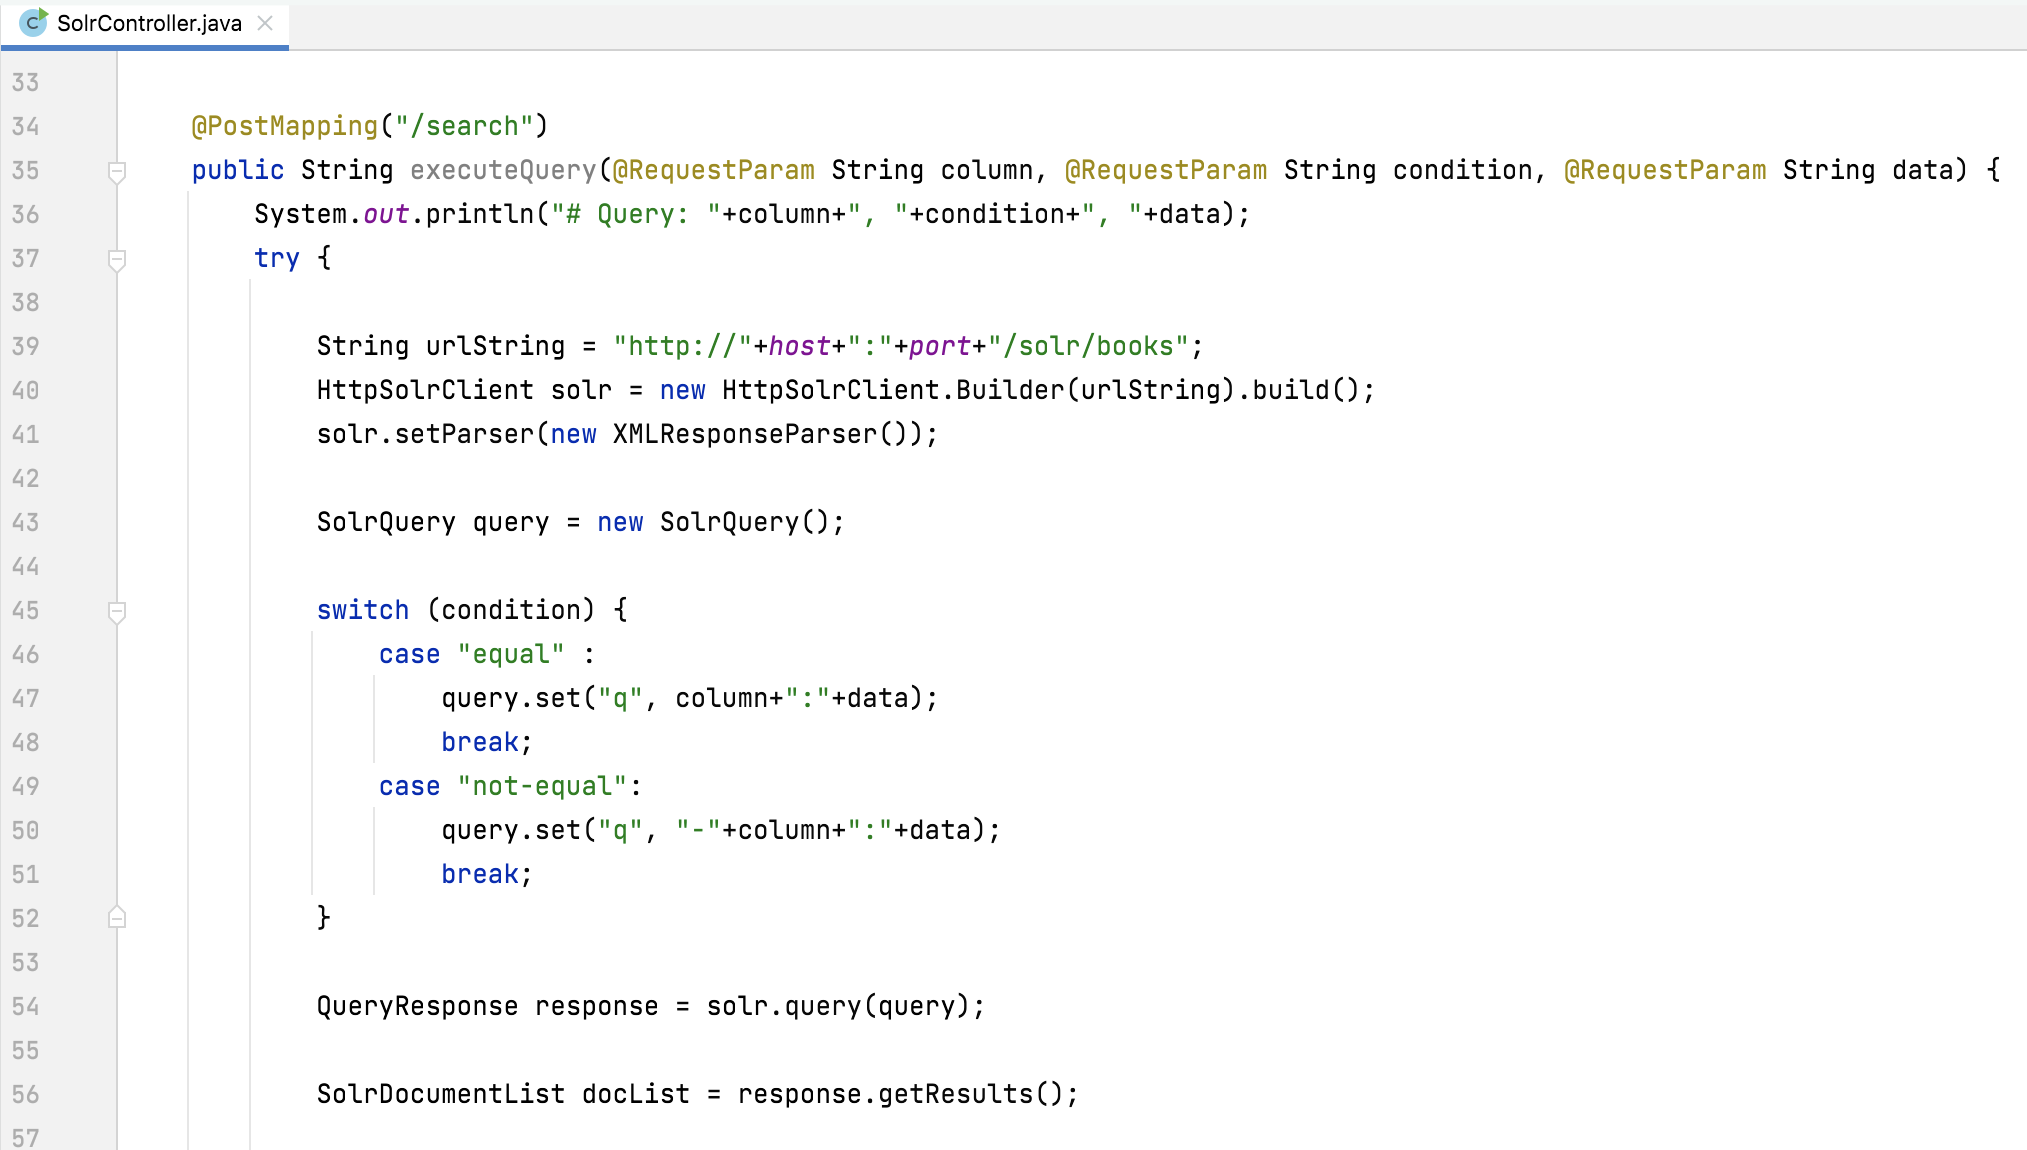
It is a core client Java file, which is responsible for running the client application and providing search services to the client page. The client performs the actions by calling the search POST URL using JavaScript and by this SolrController.java file, this search POST URL are served.

(line 34-35) In the first line the POST method has declared the mapping URL and in the second line collects the search query value from the POST request parameters.
(line 39) Create URL for Solr Search. In the URL string, appended the Solr system host and service port details along with the Solr core name (books).
(line 40) Create a HttpSolrClient object with the URL value. These class dependencies are already in the pom.xml
(line 43-52) Create a SolrQuery object and set the query string in this object. In switch, case added logic to create search query based on collected data from client page.
(line 54) Execute the search query in the Solr system and collect the response in the QueryResponse.
(line 56) Get SolrDocumentList from the result object. Here we get the list type object which is used to iterate and create table data for the client view page.
(line 58-) Add logic to create HTML string for client page according to collect result data.
[The Solr Project] final page of the success.
| Client Result Page | Solr Command Page |
|---|---|

|

|
:) ...enjoy the solr project.

